

Setting Up Magento for the Search Engines
The author's views are entirely their own (excluding the unlikely event of hypnosis) and may not always reflect the views of Moz.
As a digital agency, we work with Magento every day on both development and search engine optimisation projects. If you've used Magento in the past, you know it's a huge system with lots of menus, drop down options and settings all over the place.
Optimising Magento for search is quite straightforward once you know how to do it, so I put together an easy-to-follow guide that everyone can use to make the process easier to learn. This guide is based around the Magento Community Edition.
For this tutorial, I'm going to assume you have a basic knowledge of SEO, but I'll also point out selections along the way if you want to read more about specific aspects of SEO that I refer to.
I'm not going to cover general page layout, heading tags or the actual content you should write. This is a basic article to get the core configuration of Magento correctly setup, and to help people out with some of the most common questions we're asked with regards to SEO and Magento.
So, log in to your Magento store's admin panel and let's get stuck in.
Magento Store Configuration
Most stores that are live will have already carried out a few of these steps. That's okay, since we are covering the basics, and want to make sure we cover all the bases. Let's start from the top of the System > Configuration page and work our way down.
Go to System > Configuration > Design > HTML Head. In here, you'll see the basic fallback settings that Magento has that you can use for SEO purposes. If you haven't already setup a Favicon, then do that first. It doesn't affect your SEO, but the standard Magento one doesn't look great.
The defaults you want to ensure are set here are Default Title, Default Description, and Default Robots.
Recommended: We usually fill in the Title Suffix as well with our clients' brand name. For example, we might put - Pinpoint Designs into the Title Suffix field. This will then be appended to each title tag.
Since the above options are only fallbacks, I would normally recommend putting your company name in as the Default Title, and using a description of your company for the Default Description. It's very important that your Default Robots is set to INDEX, FOLLOW if your store is live. For a development store, you should switch this to NOINDEX, NOFOLLOW. (Remember to swap it back when you go live, or search engines may choose to ignore your website.)
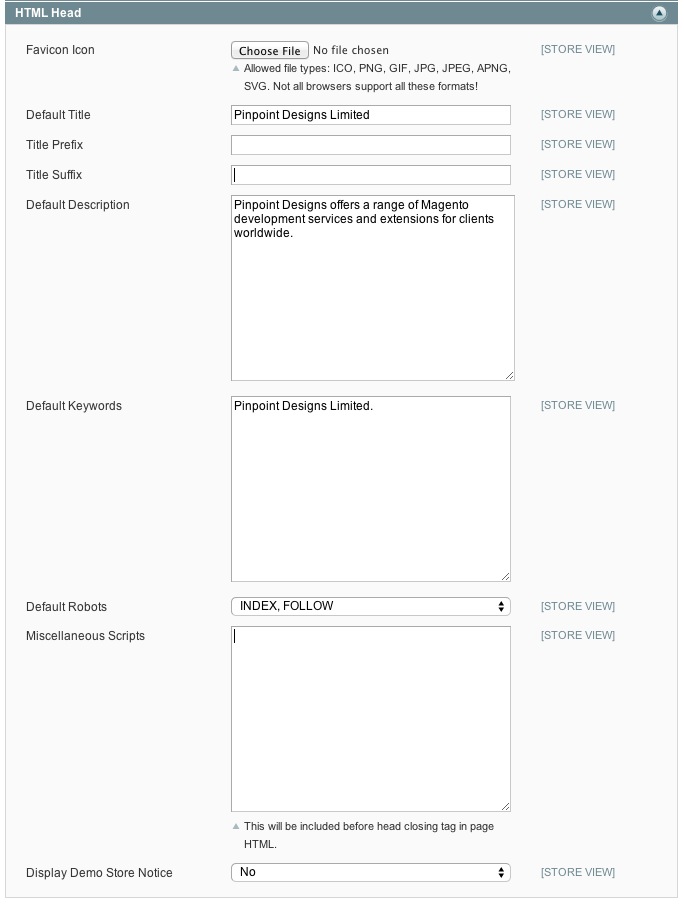
Note: While Meta Keywords are not used by many search engines anymore, Magento will roll back to your product names if these aren't set. For Default Keywords, you can enter your store name as the fallback.
If you're looking for advice on Meta Titles and Meta Descriptions, take a look at the Moz guides that I've linked to here.
Moving on, one of the easiest changes you can make to Magento is to prevent the index.php string from appearing in your main URL. At the same time you change this, you can also force Magento to the www. or non-www. version of your website to avoid duplicates.
To carry out these changes, go to System > Configuration > Web. In here, you'll see a list of different sections that you can open. We want to open both the URL Options and Search Engine Optimisation sections.
Now set Auto-Redirect to Base URL to Yes (301 Moved Permanently) to automatically get Magento to redirect to your base URL. (So if your base url is http://www.yourdomain.com, it will redirect to the www. version of your website from now on.)
Next, set Use Web Server Rewrites to Yes in order to remove the index.php string from your base URL.
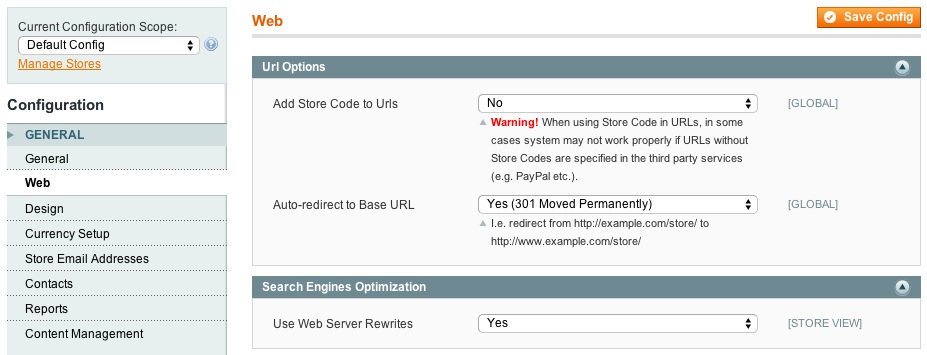
Note: The above changes may not work depending on your server configuration. If in doubt, contact your web hosting provider for assistance.
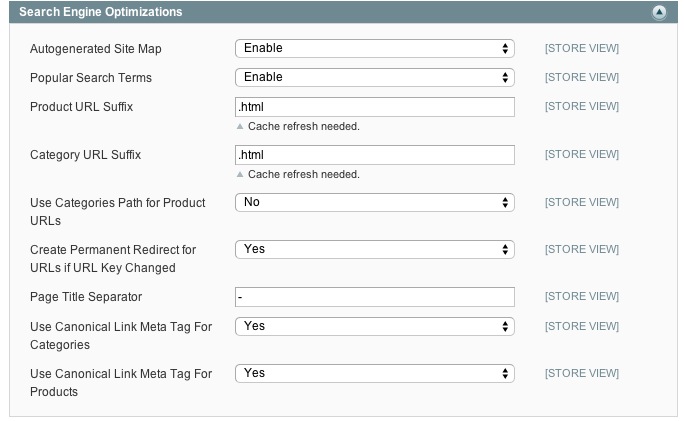
When we make the above changes, we should also enable canonical URLs. If you want to learn more about canonical URLs, check out the Moz guide here. As it stands at the moment, the pages on your site will be visible via two URLs. One with the index.php contained, and one without.
In order to get the search engines to only recognise one version, we should enable canonical URLs. To do this, go to System > Configuration > Catalog and choose the Search Engine Optimizations dropdown option. There are quite a few options that we can set in here. I'll explain them very quickly:
- Autogenerated Site Map - If this is set to enabled, Magento will generate two pages on your site that display links to your products and categories. I would recommend having this option set to Yes.
- Popular Search Terms - If enabled, this will allow pages to display your most popular search phrases. This setting should be used to target your users, rather than used for SEO purposes. Set to Yes.
- Product URL Suffix - This is the suffix that is added to the end of your product URLs. Leave the setting as .html.
- Category URL Suffix - This is the suffix that is added to the end of your category URLs. Leave the setting as .html.
- Use Categories Path for Product URLs - If enabled, Magento will include the category URL in your URL string. For example, URLs would look like this: yourdomain.com/category-name/product-page.html. I would recommend setting this to No, as leaving it enabled could have adverse effects when using in conjunction with canonical URLs set (especially on larger stores).
- Create Permanent Redirect for URLs if URL Key Changed - It's recommended to set this to Yes. This will automatically create a redirect via the URL Rewrites' module in Magento if the URL key is changed on any page on your website.
- Page Title Separator - This is the character that separates the page titles on the front-end of your store. This could be a vertical pipe if you prefer, but I would generally recommend leaving this as a hyphen.
- Use Canonical Link Meta Tag For Categories - If enabled, a tag will be added to the HTML code on categories displaying the main version of the category page. This is then picked up by search engines to avoid duplicate content. Set this option to Yes.
- Use Canonical Link Meta Tag For Products - (Same as above for Product Pages.) If you have the categories option above set, then it's not as important to have this set to Yes, since only one version of a product page will appear. However, to ease your mind, I recommend setting this option to Yes.
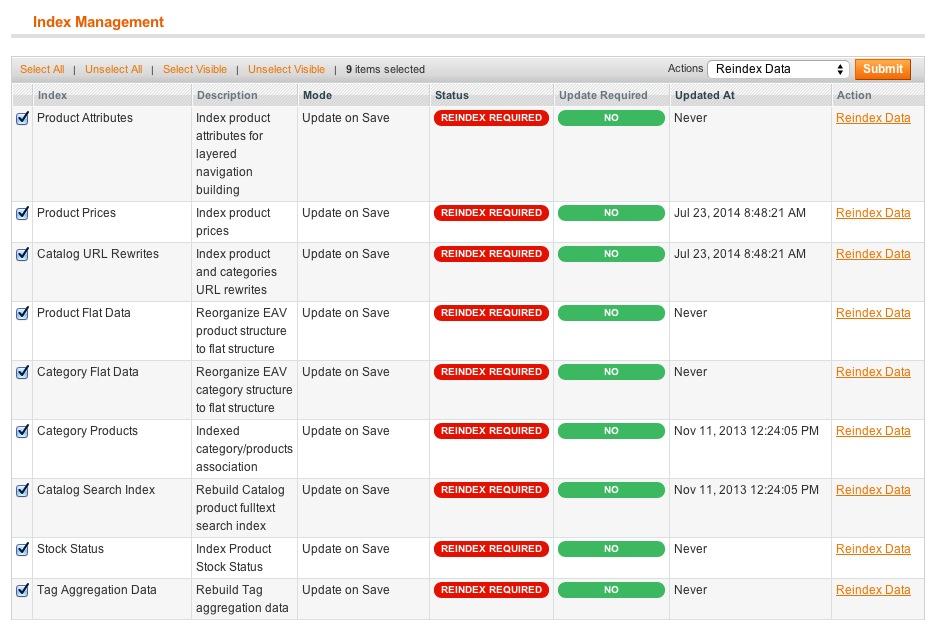
Once you've updated these settings, it's important to reindex the data on your website. To do this, go to System > Index Management. Click Select All and then Reindex Data using the mass action drop down in the top right hand corner of the page.
XML Sitemap Generation
The easiest way for a search engine to crawl your website is via a sitemap submitted to Google Webmaster Tools, Bing Webmaster tools, Yahoo Site Explorer, etc. As you would expect, Magento will keep your sitemap up to date and generate this for you automatically. In order to enable this, go to System > Configuration > Google Sitemap (under the Catalog heading).
In here, we can configure the priority of each of our pages, along with how often they're updated and how often we want the sitemap to be updated. This section is a little hard to explain in a tutorial, as it completely depends on your type of store and what you're primarily optimising.
For the purpose of this article, we're going to assume your category pages are the most important pages, as these house all of your products and should be optimised for more general terms. We'd next prioritise product pages, as these are specific pages that you want people to hit if they're looking for a particular item. Finally, we'd have our CMS pages. These are pages that cover information such as terms and conditions, your privacy policy, and shipping information, so they're generally lower priority. Your homepage also comes under the CMS pages heading.
So, using the above as an example, we'd select the priority and frequency as follows:
Category Options: Frequency set to Daily; Priority set to 1.
Product Options: Frequency set to Daily; Priority set to 0.5.
CMS Page Options: Frequency set to Weekly; Priority set to 0.25.
With the above, if your product catalog and categories don't change very often, you could drop the frequency down to weekly, but this isn't necessary.
Note: For the Generation Settings to work, you will need to make sure your Magento cron works correctly.
Next, we need to generate the actual sitemap file. To do this, go to Catalog > Google Sitemap and click on Add Sitemap Button in the Top Right. Then give your sitemap a name, and put a forward slash in the path file to get it to save in the root directory.
Once done, click Save & Generate and your sitemap should be viewable at yourdomain.com/sitemap.xml.
Assuming it all worked correctly, head over to Google, Bing and Yahoo and submit the sitemap URL you've just generated. We'll add it to the Robots.txt file later.

Additional Notes: If you're running multiple stores from the same Magento installation, you might want to separate your sitemaps. So using the example of an English and Spanish store, you might call one sitemap-en.xml and the other sitemap-es.xml. You might also want to put these into a subdirectory. If you do this, you will need to make sure that the folder has CHMOD permissions to write. CHMOD 755 should be fine, but you may need to change this to 775 on certain setups. Never set your CHMOD permissions to 777. If in doubt, ask your hosting provider.
Robots.txt
I'm not going to go into huge detail on the Robots.txt file as there's a fantastic guide written by Inchoo with example templates and different versions explained. Take a look at it and make a judgement call on which Robots.txt file will do the best job for you. You can then modify it to suit your store's particular requirements.
Remember to update the sitemap URL with the one we just generated (above). This will allow other search engines to pick up your sitemap without the need to submit to them all.
On the above guide, I would strongly recommend using the Inchoo Robots.txt file. That said, it's important to check everything over before you add it to your store.
Moz also has also written a guide to explain the Robots.txt file in more detail.
Google Analytics
Adding your Google Analytics tracking code to Magento is very straightforward. Head over to http://analytics.google.com and log into your account. Make sure that you have eCommerce tracking turned on. (This can be done by going Admin and clicking on the Ecommerce Settings option which appears under the View heading on the right.)
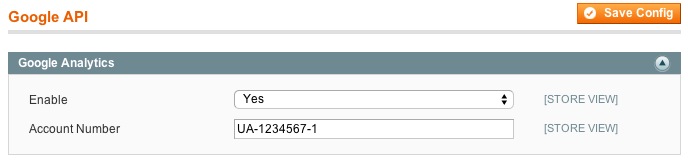
Once you've done this, head over to System > Configuration > Google API to enable the module and check your UA- Tracking Number. Click Save and you're done.
Alternative Solution - I would recommend installing the Fooman Google Analytics + module, which is free from the Magento extensions store. This allows you to track AdWords conversions, secondary profiles, dynamic remarketing and more within Magento. If you're unsure of how to install modules, ask your web developers, or follow this guide. Once installed, go to System > Configuration > Google API and open up the option for GoogleAnalyticsPlus by Fooman. Fooman offers a full guide on how to set this module up, and it's much better than the standard Magento tracking.
Page Optimisation
Finally, let's take a look at page optimisation. This is a fairly simple section of Magento where it's really down to you to come up with some brilliant content and make sure your pages are optimised properly for the search engines. We'll split this into three sections: CMS Pages, Category Pages, and Product Pages.
- CMS Pages - CMS pages in Magento are content pages. You generally use them for adding information pages to your site. They can be very powerful and pull in related products, etc., using widgets. As with all pages, it's important that you optimise them correctly. The key things to look out for are as follows:
- Page Title - On CMS pages, Page Titles are usually quite straightforward, such as Terms and Conditions or Shipping Information. You can also use these for information pages that drive traffic to your store.
- URL Key - This is the URL that your page sits on. If you are a company selling plumbing equipment for houses, you might create a piece of content that sits on a CMS page called Radiator Size Guide. The URL Key might then be radiator-size-guide, which would make the URL yourdomain.com/radiator-size-guide/.
- Content - This is your key area. The phrase "content is king" may be used all the time, but it's definitely a good cliché to bear in mind. Write good content for your pages, structure it with different heading tags, make it interesting... and the page will be fine. Add images, get your keywords in there, and make it look great.
- Meta Data (Keywords and Description) - Meta Keywords are not used much in SEO anymore. Most people use them to gather information from competitors to find out what keywords they're targeting. The main section to fill out here is the Meta Description. Make sure you keep your Meta Description short (150 - 160 characters) and relevant to the page content.
- Category Pages - Categories are likely the most powerful pages on your store for driving traffic (potentially after your homepage). For this reason, it's important that you fill them out in full with as much information as possible. The main sections to consider are as follows:
- Name - This is your category name.
- Description - Make sure you fill out a full, relevant description of your category. Include keywords that the search engines will pick up, and make sure it's ultimately beneficial to the user. There's nothing worse that visiting a website that says "we sell a range of green slippers and blue slippers and yellow slippers and orange slippers and purple slippers for christmas, birthdays, weddings, anniversaries and other slipper related occasions." That said, think of your users first... but try to get include your main target keywords in there, too.
- Page Title - This is your meta title. Keep is fairly short. And remember, if you've got your default Title suffix set in Magento, your brand name will automatically be added to the end. Keep it relevant, too, and get your keywords in towards the beginning of the tag.
- Meta Keywords - As mentioned in the CMS Pages section, these aren't really required anymore. Fill them in separated by commas if you want to be really keen.
- Meta Description - This is very important, so make sure it's completely relevant to your category, covers the products that you're selling and reinforces your brand. Your Meta Description shows in the search engines and should be used to encourage users to click through to your site. Don't forget to get your target key phrase in there!
- Side Note: If you've got a category that's got lots of filters on it, make sure that Is Anchor is set to Yes in Display settings. This will ensure that layered navigation is enabled.
- Product Pages - Finally, we've got Product Pages. These are the key pages that you want to drive traffic to. Try to fill as much information in on these pages as possible. If you're using Google Merchant Centre to promote your products, you want to make sure you've got your product attributes correctly configured to pass as much information back to Google as possible. If you're just looking to optimise the pages for search, then the following sections are the main areas to look at:
- Name - Same as above, this is your product name. Try to make it descriptive. Think about what people might search for.
- Description - This is your full product description. Try to go into as much detail as possible, making your content completely unique, relevant to the product and helpful for the users. If you don't have HTML experience, use the inbuilt WYSIWYG editor to format the descriptions to look smart. Make sure they're easy to read, too.
- Short Description - This is dependent on your product theme. Usually, this is the description that pulls through onto your Category Page. Make sure this is unique, but outline the key features of the product in a sentence or two.
- URL Key - This is the URL that the product will be visible on. Ensure that this contains the product name, manufacturer and model number if it's from a wellknown brand. Due to the way we've setup the URLs above, this will make the product URLs appear as follows: yourdomain.com/Philips-Sonicare-DiamondClean-Black-HX9352-Rechargeable-Toothbrush. This is quite a long URL, but it contains all the information about the product which will be relevant to users searching for it, including the model number and manufacturer brand.
- Meta Information Tab (Meta Title, Keywords and Description) - It's easy to miss the Meta Information Tab in Magento, but it's important that you always give your products a well-written meta title and description. Keywords are optional (as explained above), but make sure that you keep your titles and descriptions within the correct length.
Key Things to Remember About All the Above Pages
- Your Page Titles should contain the keywords you want to target. Usually it's better to have these closer to the beginning of the Page Title.
- The Page Title should be written for the user, not the search engines. Whilst you're going to include keywords, make sure they work to provide you a good click through rate from the search engines.
- If you added your brand name to the Title Suffix as described further up in this article, you will need to take this character limit into account.
- Meta titles and descriptions should always be relevant to the content on the page. They should be descriptive and encourage people to click through without looking spammy.
- I personally like to add the brand name into the Meta Description, but this is optional. I think it reenforces the brand name further.
- Don't go above the character limit recommended by Google for page titles and descriptions.
- If you have Magento multi-store set up, all of the above values can be changed on a per-store view basis.
I hope this article has been helpful. Depending on the response, I may do a follow up article that explains the more advanced sections of Magento.
Magento is a very powerful system that is easily scalable, and I work with our clients at Pinpoint Designs worldwide to build and promote their stores with it. So if you have any questions regarding Magento, post a comment below and I'll respond as soon as possible. You may also find the Pinpoint Designs Blog helpful, as we keep it up to date with regular features on Magento and reviews of new extensions.


Comments
Please keep your comments TAGFEE by following the community etiquette
Comments are closed. Got a burning question? Head to our Q&A section to start a new conversation.